DIY Swing Set | Build Your Own the Easy Way!
A guide on How To Build a Wooden Swing Set the easy way, and on a budget! Update your backyard with this DIY swing set that’s a fun and easy summer outdoor project. Your kids will love it, and you’ll save money in the process.
We’ve been working hard on your backyard this year, adding a few more fun things for the kids to play on. One of the items that we really wanted to get was a large swing set. We’ve had a wooden play set for quite awhile, and it has a couple of swings, but as kids get a little older–7+–they start getting too big for those smaller swings. After looking around at prices to purchase, we decided to build our own. It just took an afternoon, and my kids were playing and swinging.
We needed a swing set that could hold our bigger kids (8-12), and give them more of a playground experience. I started looking at large swing sets, and the prices were just not what I wanted to pay, so we decided to make our own swing set! After a bit of research, I came across something that makes it SO easy–with no need to cut any wood. It’s a simple swing set, and you don’t need any specific swing set plan.
I honestly can’t believe how easy this was to put together, and how quickly it came together, considering how big it is. It’s approximately a 4-6 hour project, making it perfect for a weekend afternoon.
Table of contents
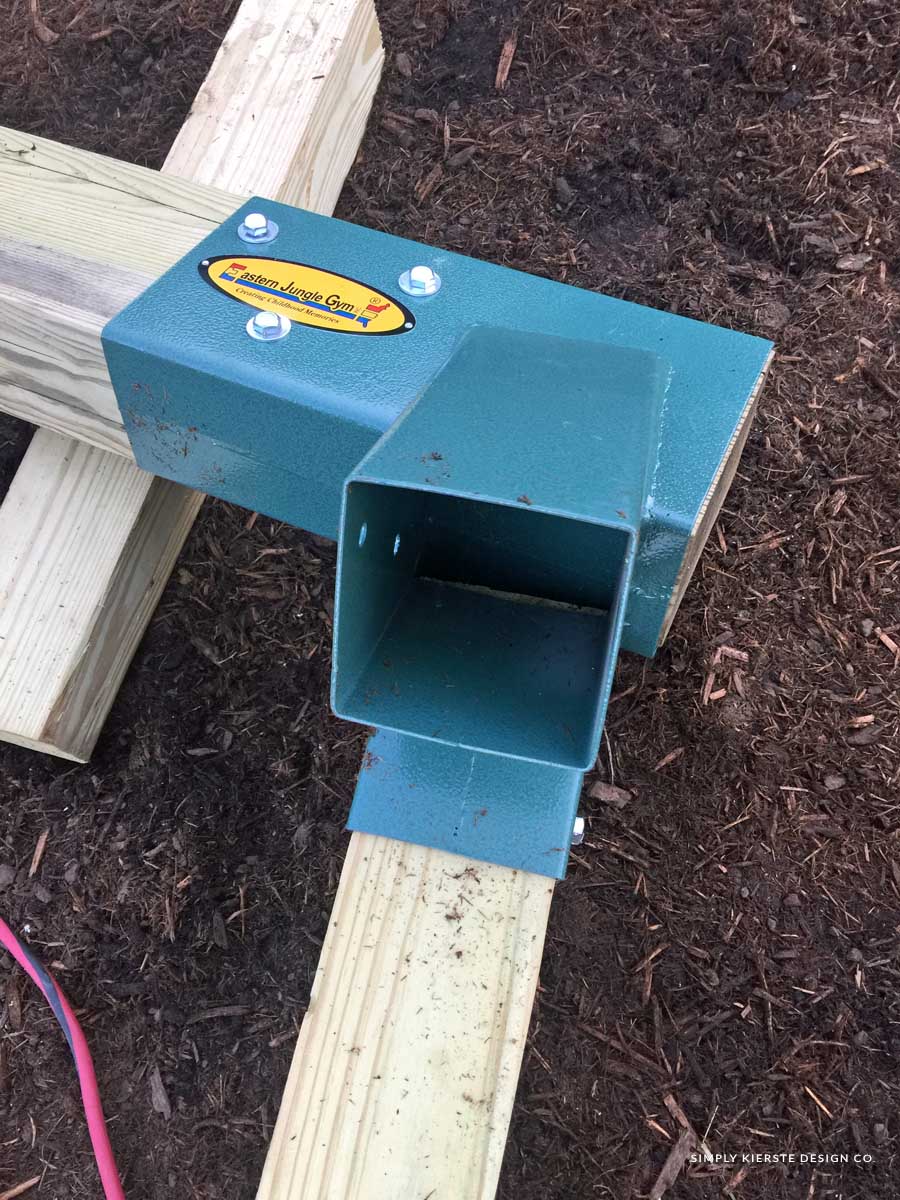
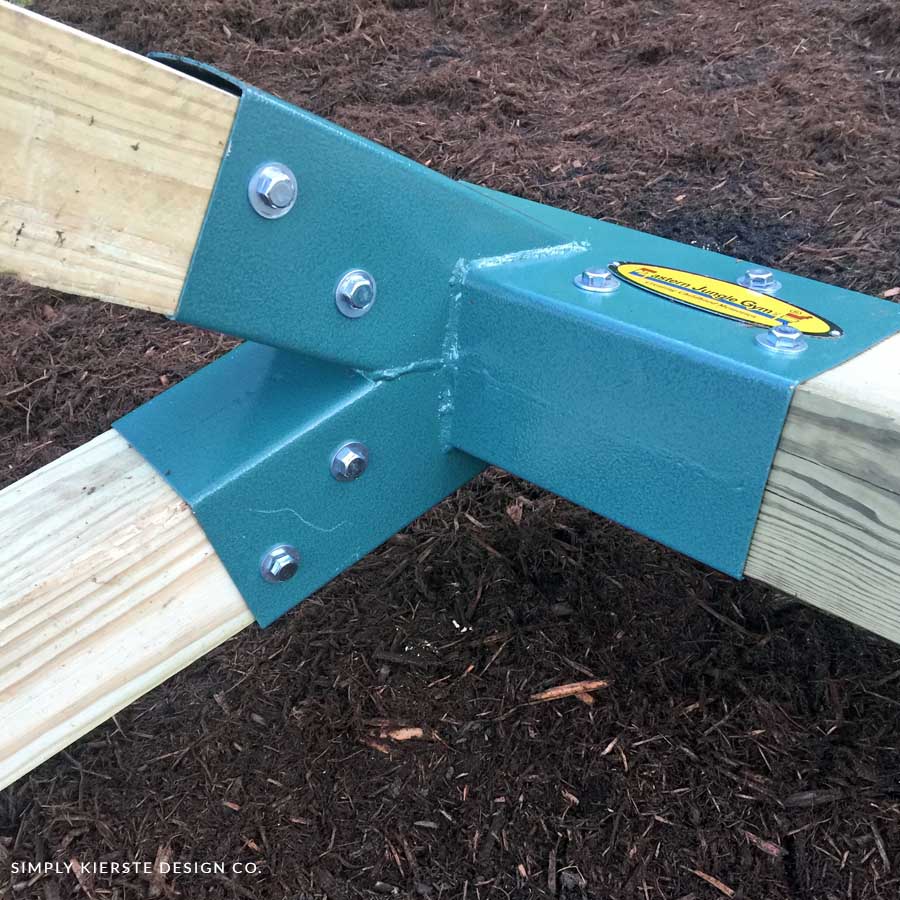
The secret is a set of swing set brackets that you just slide the wood into, and screw them in. If you buy the right size of wood posts, you don’t even have to cut them down, which also saves a ton of time.
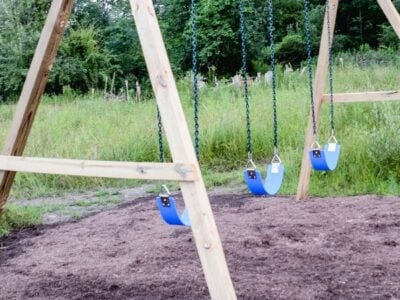
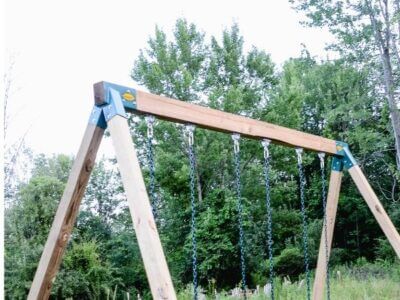
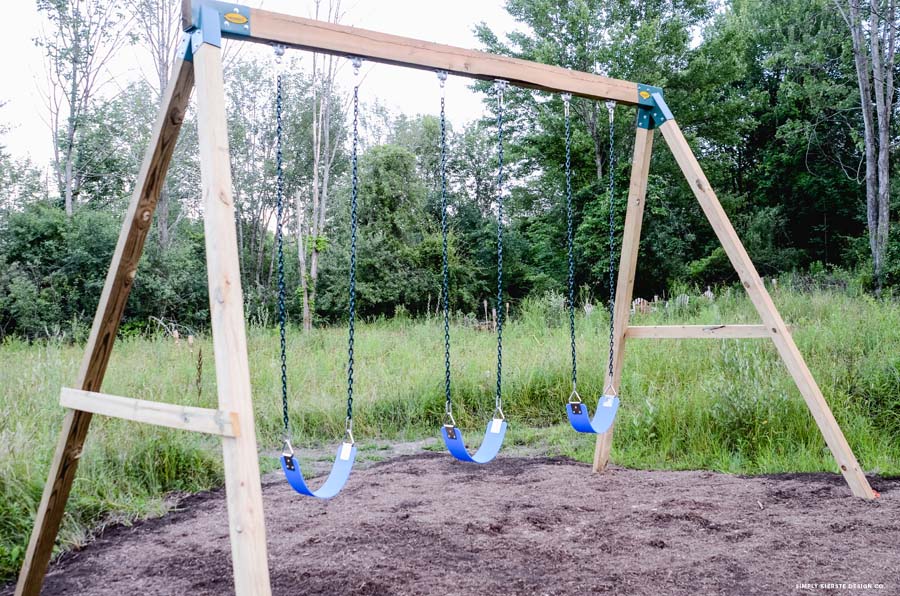
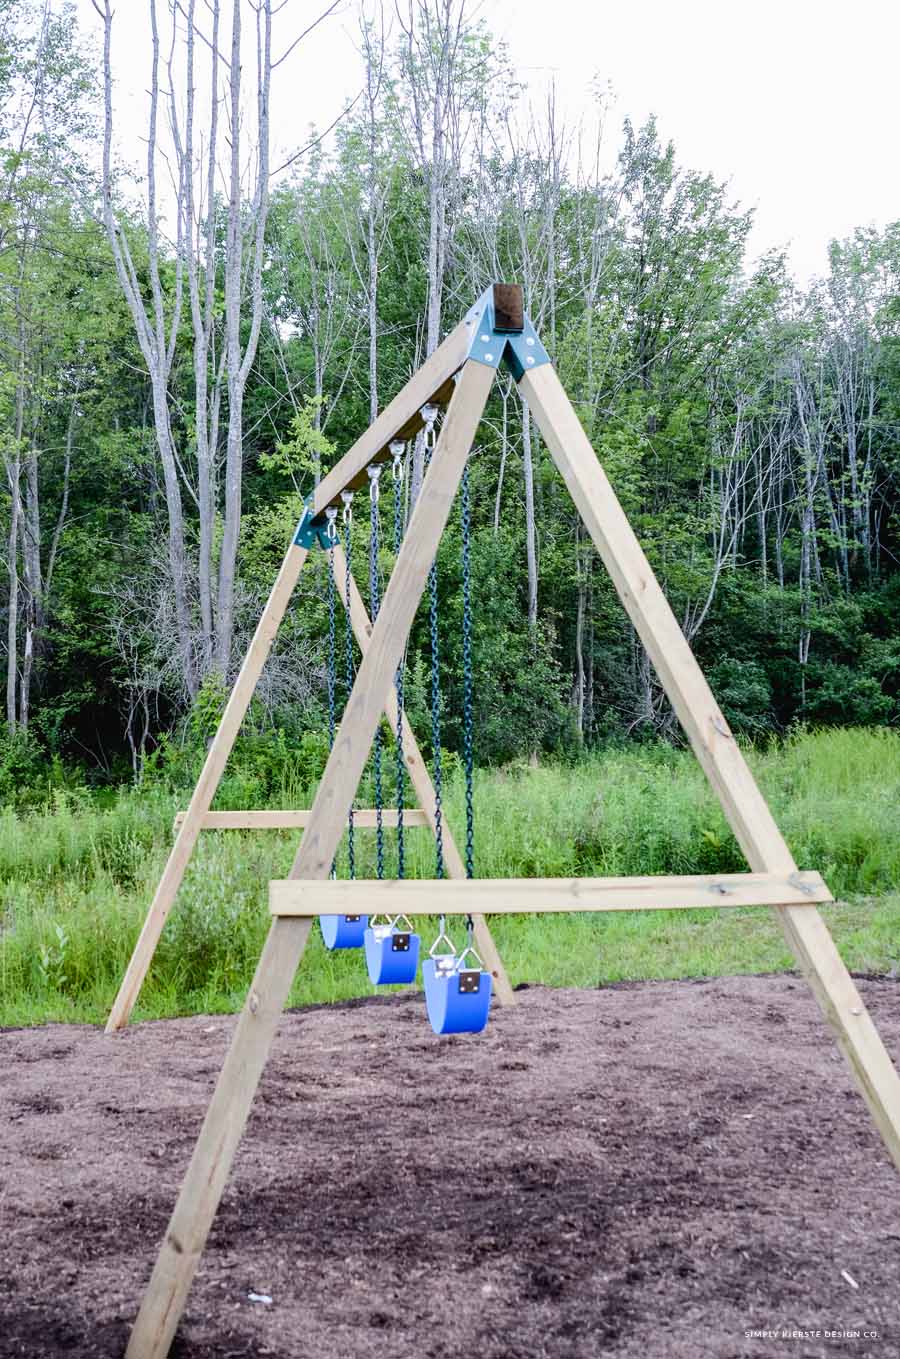
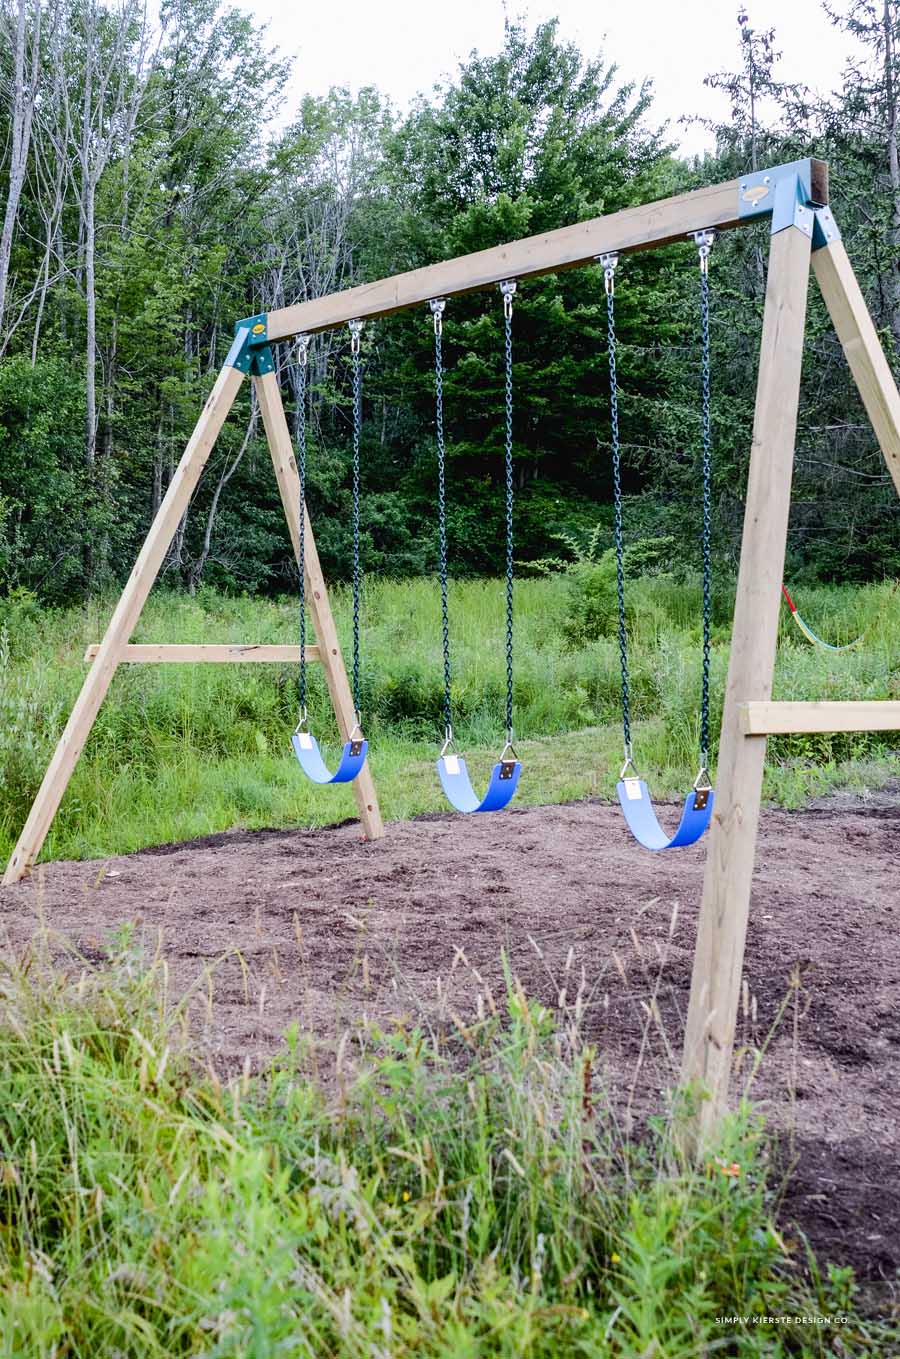
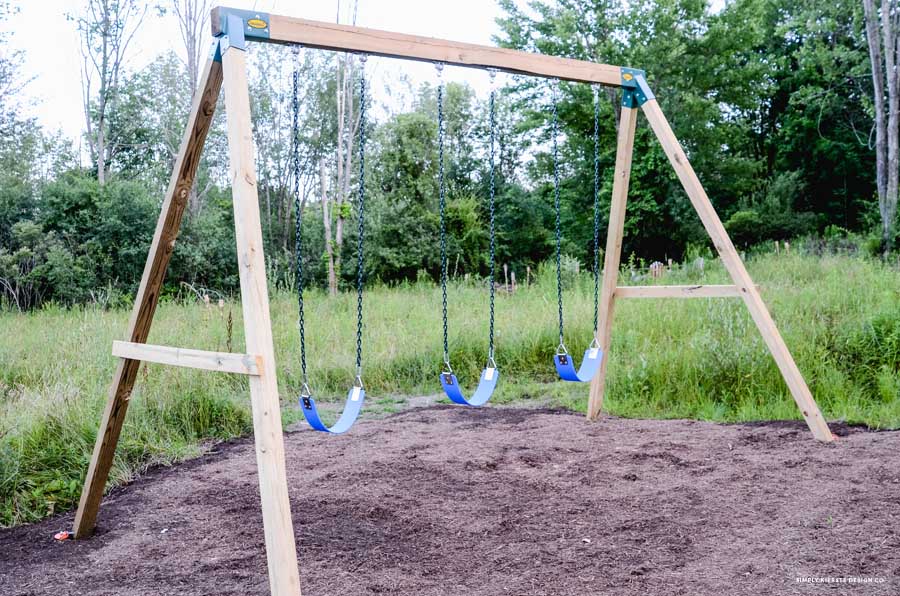
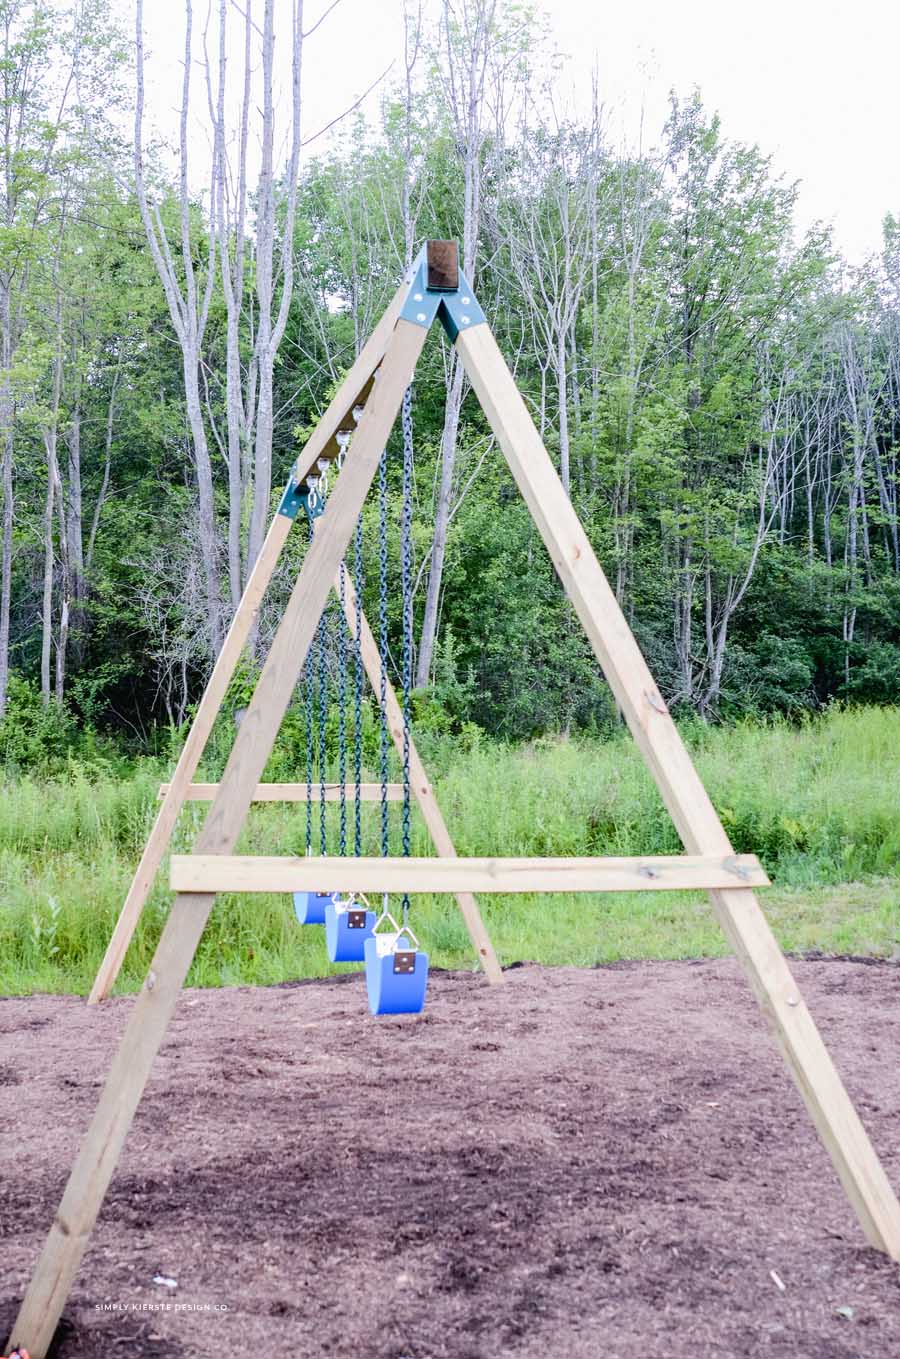
The top piece is a 4×6 post that’s 12 feet long, and it’s perfect for three swings. The legs are 4×4 posts that are 10 feet tall. We wanted them tall enough to allow the kids to swing pretty high, and to accommodate our older kids. It turned out perfectly, and the kids love it!
Affiliate links are included below. Please find my full disclosure here.
COST: around $300
TIME: 4-5 hours
Level: Beginner
Supplies
- Swing Hangers (a set of 2 per swing)
- Galvanized Bolts for the swing hangers (3/8 inch carriage bolts, 7 inches long) + Lock Washer (4 bolts and 4 washers per swing)
- Swing seat & chains
- Swing seats & chains–no swing hangers needed (another option)
- A-Frame Swing Set Brackets
- 1-12x4x6 post (pressure treated)
- 4-10x4x4 posts (pressure treated) (or 12 feet if you are going to cement them in the ground 1.5-2 feet)
- Optional: 5.5 inches x 8 ft. wood stringers for the a-frame (pressure treated)
- Anchors (we used these temporarily) OR Cement (which we highly recommend)
- Another anchor option (not cement)
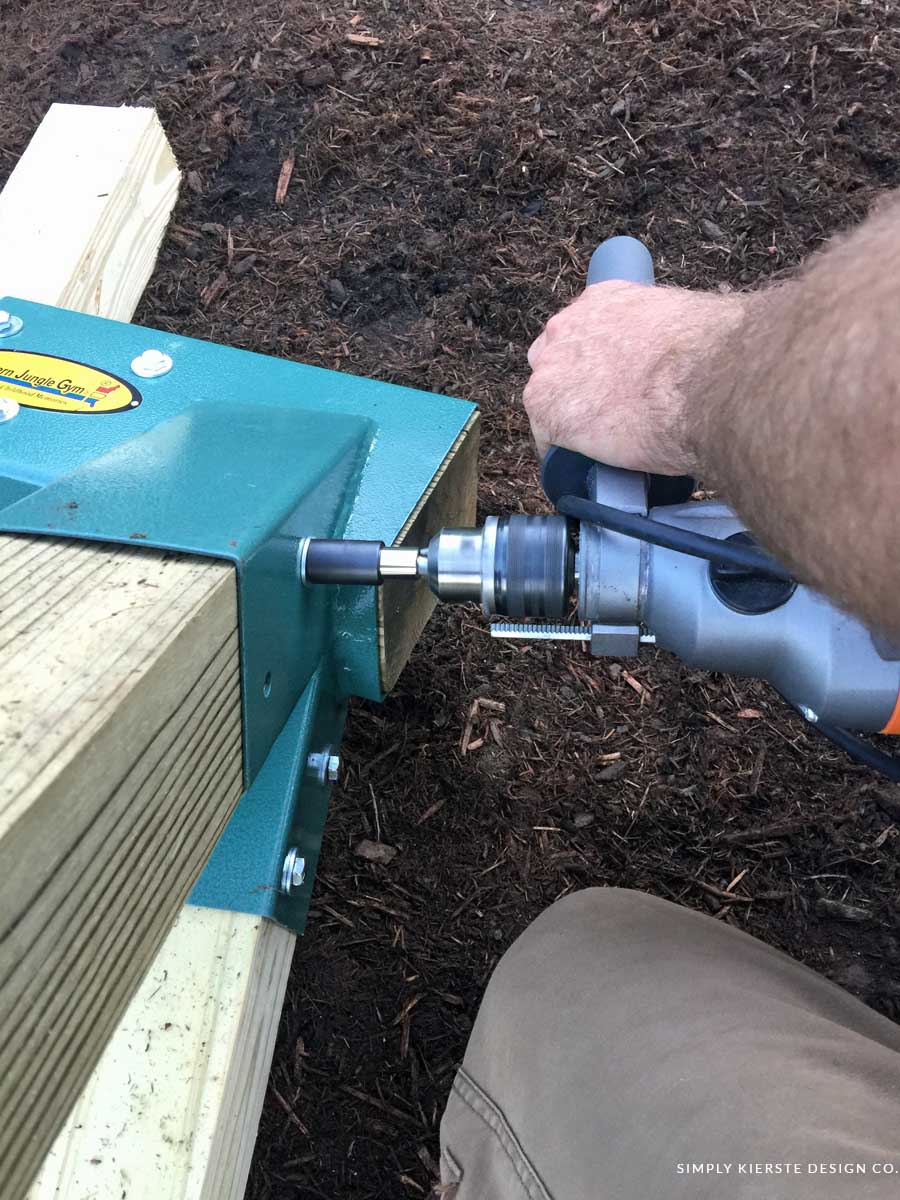
- Drill (we used a Hammer Drill, which is AWESOME!)
TOTAL COST: around $300
This amount reflects the prices of wood and supplies at the time we built them. Wood can greatly vary in cost from area to area, so there could be a difference for you—either more or even less. But to purchase a swing set of this size and durability, it would be much more. I’m so pleased with the swing, and with the cost savings!
How to build
You’ll need the posts and the brackets first–and in the set I purchased (linked above), all the bolts needed came with it. Make sure you are using pressure treated wood–that will make it last outside much longer. We also used galvanized bolts and screws for the same reason.
We laid out the top beam first, with each end resting on top of a scrap 4×4 post, to keep it off the ground and easier to work with. Then we slid each end of the post into their respective brackets, and drilled the bolts into place.
Next we slid the 4×4 posts into their respective brackets (bottom sides, then top) and bolted them in. It really is as easy as that, when you use the awesome a-frame brackets!
Once all the posts were bolted in securely, we carefully brought the swing set into a standing position, and moved it where we wanted it to be. We started it right where we wanted it, so we didn’t have to move it too far. This took the two of us, and you might even need a third person to help you get it into standing position. I have had some questions about this process, and we lifted it up on either end, then walked it forward, moving our hands down the sides as necessary. I honestly don’t remember any specific details, but we were able to do it together.
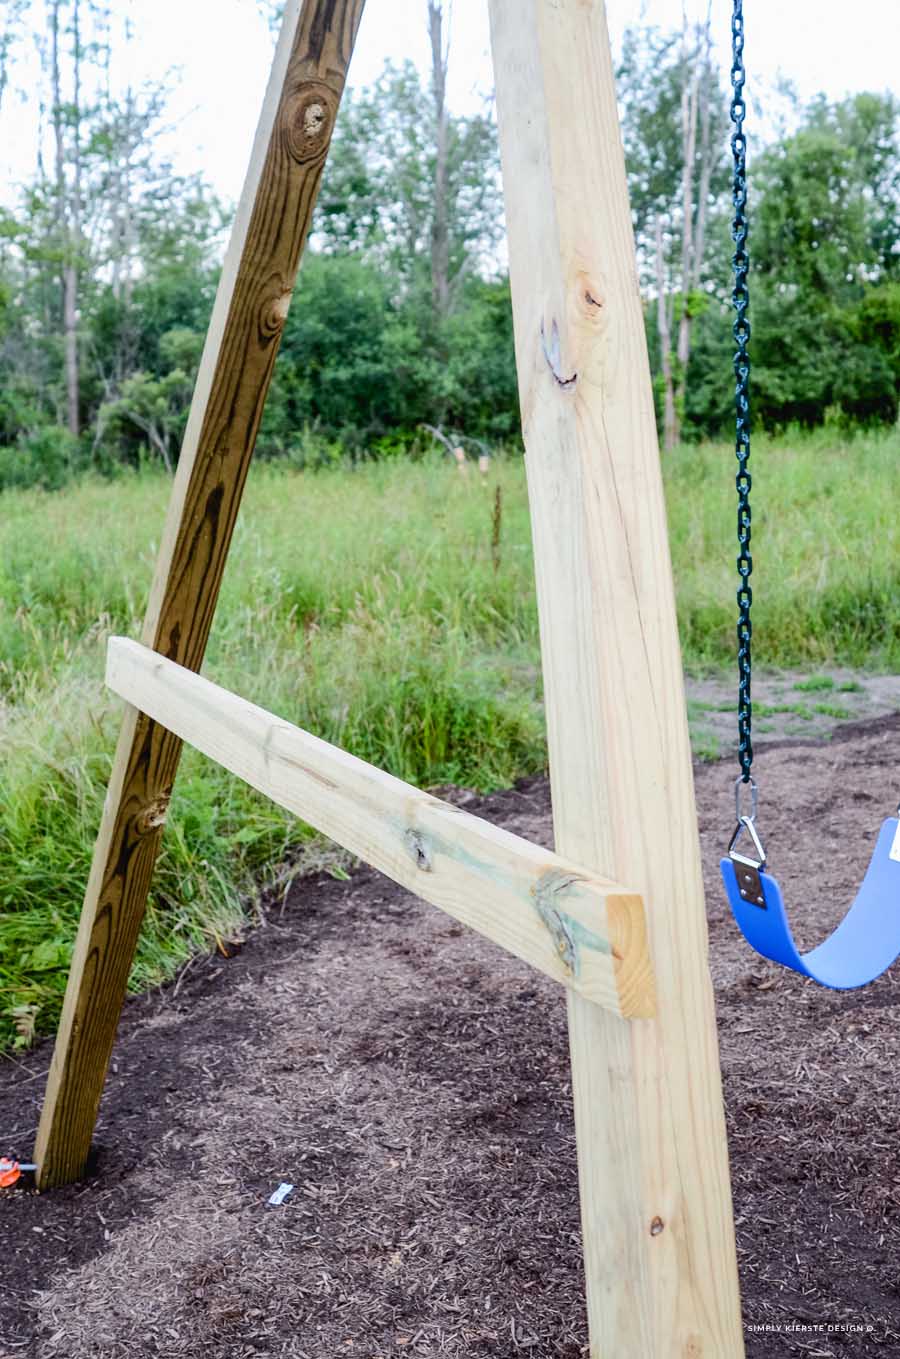
We decided to add the wooden stringers connecting the two posts on each side, and we cut them at 5.5×8. This isn’t necessary–you can do it without as well. But if you want to, it’s a super easy step. If you don’t have a circular saw or another way to cut wood at home, Home Depot will also make cuts for you when you buy it there, and these would be really easy to do. I’ve seen some locations charge for this service, but I know others that haven’t. It’s definitely worth asking about!
We anchored the swing set down for now, but we are planning to cement it in place. You’re seeing it with just mulch (used it as fill), but wood chips are next, after it’s cemented in. We highly recommend that you cement them in place, but I did add some anchor options to my supplies list.
**I added this note above, but if you are going to cement them in, then I suggest buying 12 foot 4×4 posts for the legs, so your swing is still 10 feet high.
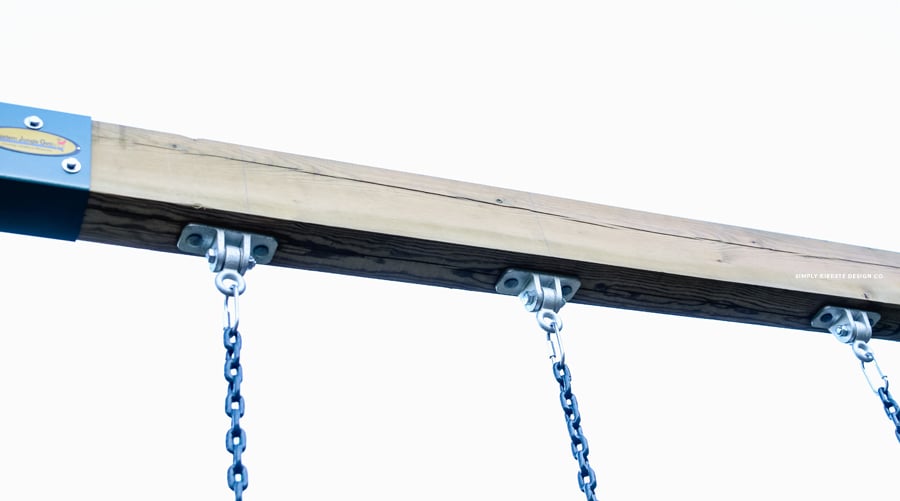
Next up…hanging the swings! I ordered separate seats and chains, because I needed a longer length chain than usual because of the swing set height. Along with the seats and chains, I also ought the swing hangers that attach to the top post. If you purchase similar ones, make sure to check if they come with the bolts to hang them. Ours didn’t, so we bought the right bolts and washers to attach them.
After the pressure-treated lumber is totally dry, we recommend adding a water-repellant sealer to the wood, so it will help prevent cracking and splitting due to weather (hot or cold), but especially where it’s sunnier. Doing this regularly (once a year is best) is a good idea for maintenance, so your swing will last longer!
MEASUREMENTS BETWEEN SWINGS
There are 16 inches from the each edge to the first bracket. The brackets for each swing have 20 inches between them (this is for the actual swing–the two brackets holding the swing up.). Then between each swing, there are 18 inches.
MEASUREMENTS FROM EDGE TO EDGE
- 16 inches–from edge to first swing,
- 20 inches–the two brackets for swing #1,
- 18 inches-the space between the first swing and second swing,
- 20 inches–the two brackets for swing #2,
- 18 inches–the space between the second and third swing,
- 20 inches–the two brackets for swing #3, and 16–the space between the third swing and the other edge.
TOTAL MEASUREMENTS OF SWING SET
8 feet deep x 16 feet wide x 10 feet high
NOTE: The dimensions for the finished swing are 16 feet–because the legs are at an angle, and stick out past the 12 foot top post. The finished dimensions are for those that need to fit it in a certain space.
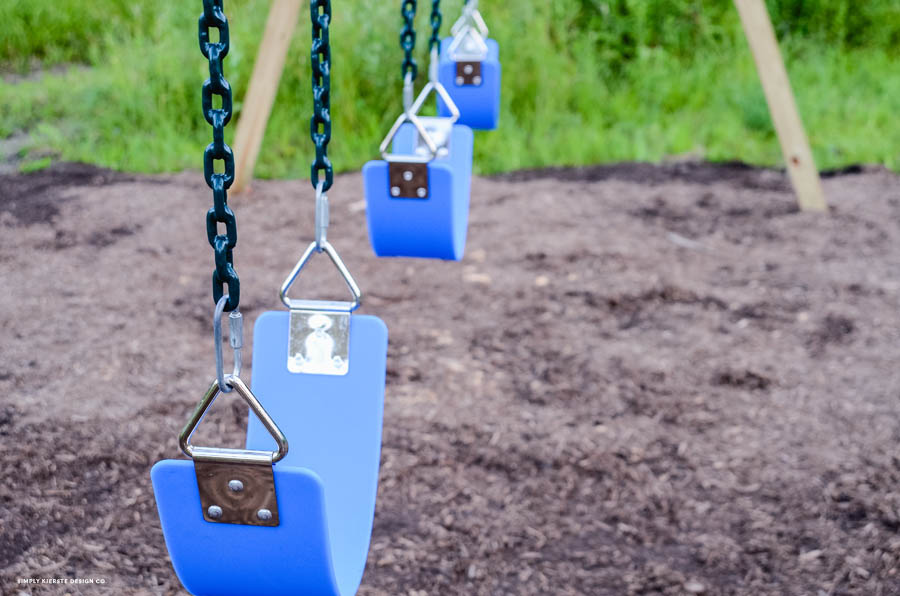
The very second those swings were on, my kids were swinging, and they haven’t stopped since. They LOVE it! Such a fun and easy summer project, that will be a wonderful addition to our backyard for years to come.
FAQ
If you’re looking for a solid wood swing set, then it’s very likely yes. We built this for around $300, which is less than what it would have cost to purchase one at the time we made it. Cost of lumber can vary, so it’s worth researching, but overall this is a great option to save some money and have a sturdy swingset for your kids to enjoy.
Absolutely! It’s been one of the projects we’ve done for our kids outside, and definitely worth the money and few hours we spent putting it together.
DISCLAIMER
We are not experts, nor engineers! We built this for our kids, and wanted to share in case others wanted to as well. If you have any concerns about safety, weight limits, or overall stability, please contact other sources. The Eastern Jungle Gym Company may be able to help answer specific questions–they are the makers of the a-frame brackets that hold the structure together.
Update 2024
I thought it would be helpful to add an update so you could see how it’s held up since we built it 6 years ago. It’s gotten a lot of use, from a lot of kids, and it’s completely solid and sturdy. We still absolutely love it!
More outdoor ideas
Thanks so much for stopping by! Follow me on Instagram and Facebook for even more ideas and inspiration. I’d love to see you there!

*Originally posted 2018.